Friday, September 21, 2012

Bad lighting + blurry shots + weird angles =

Today I wanted to show you some awesome pictures of a project I finished up this week, but after uploading the photos I see that none of them are up to par with the standard of photography I try to keep.  Bad lighting + blurry shots + weird angles = not so good photos, so pics of the new project will have to wait.... sorry.

I've also been getting a little piecing done as well as some embroidery and some quilting, but alas, no pictures of those projects either.

I'll try to get some more pictures taken today, but until then I'll leave you with a picture I did manage to take this week of my new baby.

New 3/4 Size Sewing Machine


I got the Janome Sew Pretty Sew Perfect machine both as a travel machine and also as a beginning sewing machine for the little girls I teach to sew.  It's 3/4 size and slightly slower speed I hope will make it easier for little hands to learn on.  How cute it is is just a bonus!

And while you're here, I should take the time to mention that my fabric mosaic for Rachel of Stitched in Color's "Softly Against Black" mosaic contest has made it into the finalist round.  You should be sure to check out all the finalists and vote for your favorite mosaic while you're there!

Softly Against Black fabric mosaic


name for blog


Oh! and P.S.  This is my 95th blog post.  I'm planning something big for #100, so be sure to stick around!

Sunday, September 16, 2012

September Bee Blocks

What?!?! It's not even the end of the month and I've already finished my bee blocks? Crazy!

Here is my September block for Anneliese in Stash Bee.

September Stash Bee block


I used a lot of Good Fortune scraps while making this one.

And here are my BELIEVE at do. Good Stitches blocks for Vicki.

September do. Good Stitches block #1

I love the grey/black/white/red/pink color scheme that she chose.

September do. Good Stitches block #2

I had a lot of fun on this one getting the squiggly lines to match up.

September do. Good Stitches blocks

And since we had one member of our do. Good Stitches group drop pout in September I was two blocks short for the quilt I was planning so I made two additional blocks.

August do. Good Stitches #3-4

I hope everyone enjoys their Sunday, I know I'm planning to!

name for blog

Saturday, September 15, 2012

Pattern Making

I'm excited.

I just found out that Michelle of Michelle Patterns is now selling a pdf e-book detailing all the steps that go into making a pdf sewing pattern in Apache Open Office, which is a free software you can download from the internet.


I've been wanting to venture into pattern making so I snatched up this pdf as soon as I heard about it.  It's regularly $20 but you can get it for 50% off through Sunday if you use the code patternmaking.

If you're interested in getting your own copy you can find it here.

I've already downloaded the Open Office Software and I'm so excited to get started!

name

Thursday, September 13, 2012

Softly Against Black Mosaic + A Good Mail Day

Yesterday, it seemed as though the stars aligned and three of my favorite things came together....

Yesterday, Rachel of Stitched in Color (one of my favorite bloggers) announced that she was pairing up with Alice of Fresh Modern Fabric (my favorite shop to get fabric online) to offer a contest to make a fabric mosiac based on the phrase "softly against black" and this picture:


.....which I love and has been the desktop photo on my computer for months.

Here's the mosaic I came up with.  It was hard to narrow the fabric selections down to 12, especially since I thought at first I would get to choose 16, but I eventually got it to the right number.

Softly Against Black fabric mosaic

.... And as for the good mail day, I had the best swap package sitting in my mailbox today.  I received my package from my secret partner Karen in the Modern Scrappy Bits Swap and she did a great job making things that were very "me".

I had told her that I loves gnomes and dachshunds, and she went snooping in my Flickr favorites and discovered on her own that I love wonky houses.  Here's what she sent me:

Modern Scrappy Bits Haul

Modern Scrappy Bits Haul Needlebook

Modern Scrappy Bits Haul Needlebook

Modern Scrappy Bits Haul Pouch

Modern Scrappy Bits Haul Pouch

I love it all so much!  The package totally made my day!!! Thanks again Karen!

name

Wednesday, September 12, 2012

WIP Wednesday: 9/12/12

I don't normally post about my WIPs, but I thought I'd make an exception for the project I have going on right now.

I've had this tree skirt and tablerunners on my "to do" list for the last year and a half so I'm excited to show them off.  The pattern for the tree skirt is from the 2010 Holiday Edition of Fat Quarterly, and it relies on A LOT of applique.  The tablerunners match the tree skirt, with the starry background thinning out around the middle of the runners.


Right now I've appliqued all of the houses down using the blanket stitch on my machine.  Coincidentally this is the first time I've used my blanket stitch for applique and I'm loving the results.  I haven't decided yet whether to applique the stars or not.  I'm planning to quilt an "allover" pattern over the area with the stars, so I'm thinking that I might not need to applique them down because they'll be secured when I do the quilting.


SO here's a question: should I do a white backing or a printed one?  I have enough of this fabric to do the back, but I'm kind of afraid that you might see the pattern through the white.  Should I just do white?  Or mix it up a bit and use the print?  And what about binding?  Something red? Something red and white?

Also, I thought it might be inspiration for me to get stuff done if I made my horrendously long WIP and "to-do" list public.  So here it is:


name

Tuesday, September 11, 2012

I'm Registered!

The Sewing Summit

I have to say that I was very surprised when I went to look at the registration page for Sewing Summit this morning only to find that registration for classes was already open and that classes were filling up rapidly.

I registered right away and had to go back twice to change classes that filled up before I could confirm payment.  I was lucky though because my friend Rebeckah who was registering right behind me managed to loose almost all the classes she wanted before she could confirm payment.

Here's what I got:


Even though I didn't get ALL the classes I wanted I've very thrilled with what I did get.  Only one more month!!!! EEEEEkkkkkkkk!

EDIT: So it seems as though registration was open early as a test and classes weren't really all full.  My friend Rebackah was able to go back and register and got all the classes she wanted. 

name

Patchwork Camera Bag

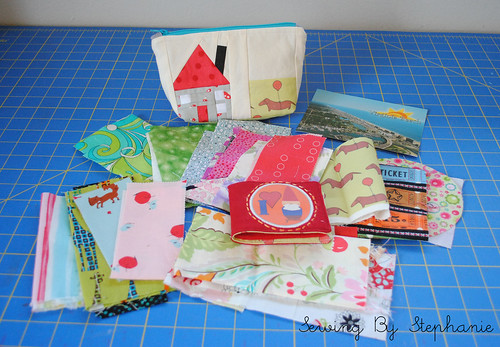
Happy Tuesday everyone! Here it is, the big reveal of my most recent "big project".

Closed Camera Bag

For my aunt's birthday she requested that I make her a camera bag.  I of course thought, "Hey, no problem, I've already made this camera bag, I'll just make one for her using the same pattern.  Easy-peasey"...  WRONG.

The problem was that my aunt wanted a bag big enough for both her large DSLR and an extra lens, and the largest size in the pattern from Michelle Patterns that I used to make my padded camera pouch is nowhere near big enough to hold her camera let alone the extra lens.  Okay, I had to scrap the idea to use the pattern... instead I decided to make my own.

For years before I became a serious sewist I made up all of my own bag patterns, and believe me, they were functional but not pretty.  Over the last few years though since I've been serious about my sewing I've picked up lots of new tricks and I wanted to use them to make this camera bag.

 Here was the check list of features I wanted the bag to include:
-lots of padding
-structured
-zippered pocket for phone/wallet
-side pocket
-top flap
-adjustable strap
-divided interior

I actually managed to get all of the things on my checklist done except for the adjustable strap.  I couldn't find any hardware locally for the strap so instead I just made it a fixed length.

Open Camera Bag

 For fabric I went with a line I knew she would love, Good Fortune by Kate Spain, which I had a charm pack of as well as some fat eighths I bought from Bloomerie Fabrics.  For the lining I used a solid purple that I had laying around.

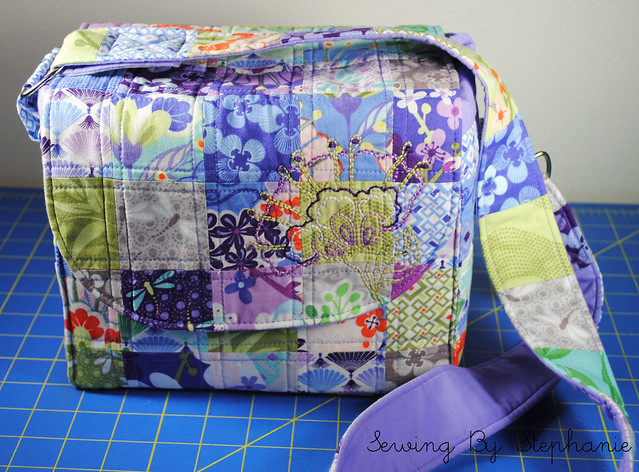
 I cut each charm in quarters and then arranged them to make a patchwork exterior.  I kept the quilting very simple and just straight-line quilted 1/4 inch from each seam on the patchwork.  For the bottom I faked the patchwork quilting since I used a solid piece of fabric for the base instead of making it patchwork.

Base of Camera Bag
Base of Bag
To make my bag both super padded and structured I used two different Pellon products: Pellon 71F ultra firm stabilizer and Pellon thermolam plus.  I actually used three layers of the thermolam to get all the padding I wanted, and one layer of the ultra firm stabilizer between the thermolam layers to add stiffness.  I thought it might be too much for my sewing machine needle to get through but it sewed through all the layers like a champ.

Closed Camera Bag

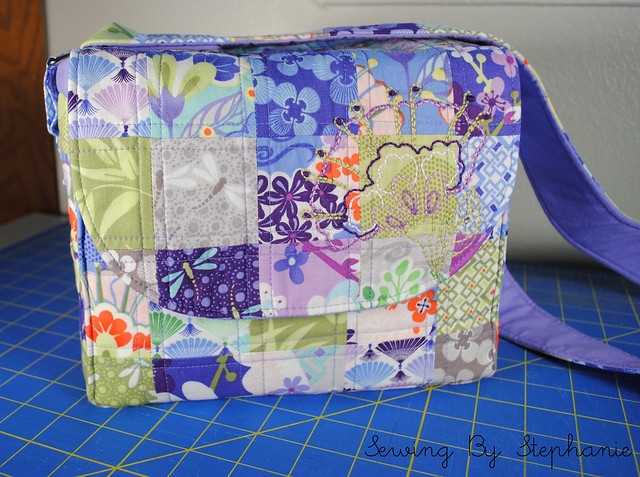
To make the bag a little more special I did a little embroidery in the flap.  I used one of the prints from Good Fortune as inspiration and drafted my own pattern on the flap and then embroidered it using perle cottons.  It's kind of hard to see in the pictures since the patchwork background is so busy but I think it adds a graceful touch to the bag.

Detail of Emberoidery on Camera Bag
Detail of Embroidery on Bag
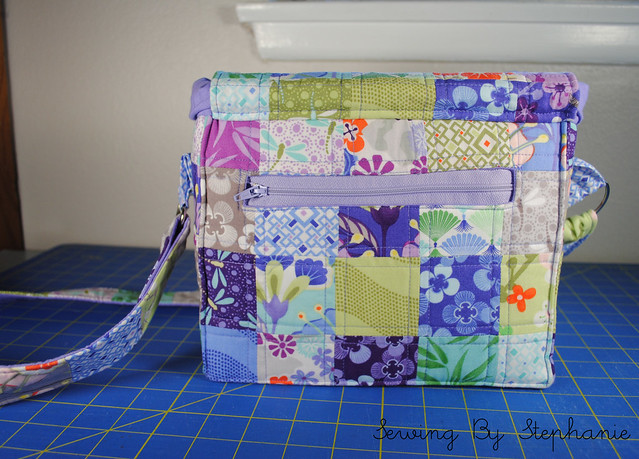
Zip on Back of Camera Bag
Zippered Pocket
On the back of the bag I put in a zippered pocket.  I actually made a mistake putting it in and cut the hole for the zipper too wide, so in the end I had to struggle to get the zipper secure since it was almost too narrow for the hole I made for it.

Open Zip On Back
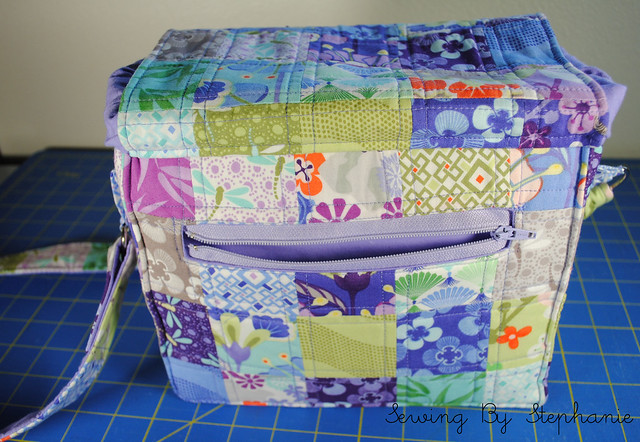
Open Zippered POcket
To add to the security of the camera bag in addition to having a flap I also made a drawstring closure to keep the camera in the bag.  I used a technique very sililar to the one described by Michelle in her padded camera pouch pattern but altered to fit the dimensions of my bag.
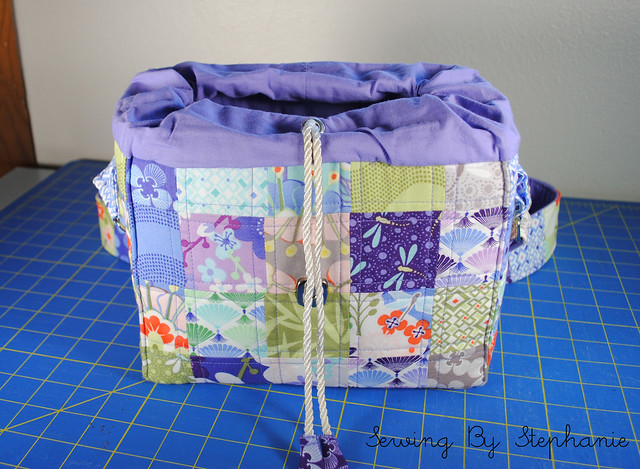
Camera Bag Drawstring
Drawstring Closure
I also added fabric to the end of the drawstring for a little extra decoration and also to hide the knots at the ends of the rope.

Camera Bag Pull Ties
The side pocket is also the perfect size to hold a lens cap or possibly even a map or phone.
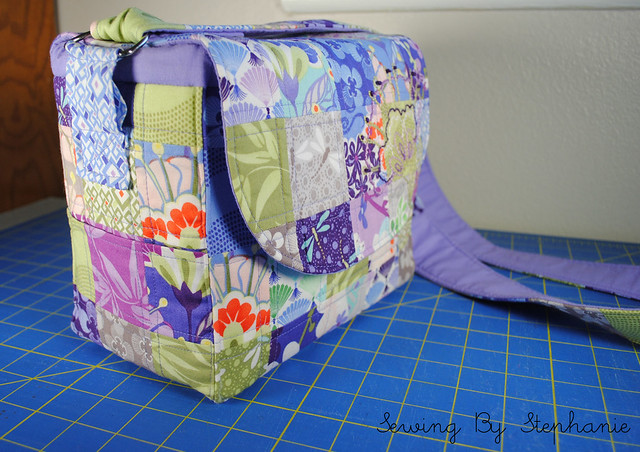
Camera Bag With Side Pocket
Side Pocket
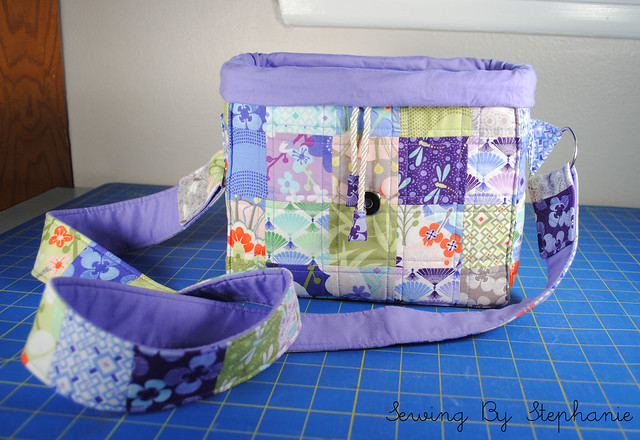
And last but not least the inside!  I made a padded divider to go inside the camera bag so that the camera and the extra lens don't bump into each other when they're in the bag.  I had to take this phot with my small point and shoot because as you can see in the picture, my normal camera is in the bag!

Inside Camera Bag
Divided Interior
I truly, honestly, love this bag.  It was pretty difficult to part with.

To be honest, I've been wanting to make a camera bag for my own DSLR + extra lens for a while now and just haven't made the plunge, so making one as a gift to kind of "test the waters" has been great.  Now I just need to find the time and the perfect fabric so I can make one for myself hopefully before Sewing Summit next month **fingers crossed**.

name

Monday, September 10, 2012

Mouthy Stitches 2 Mosaic


Mouthy Stitches 2

I was lucky enough (and quick enough) to jump in on the second round of the Mouthy Stitches Swap on Flickr while there was still room. For the second round of the swap we're making our secret partners tote bags using this tutorial from Skip To My Lou.

This is the mosaic I came up with:

Mouthy Stitches 2 Mosaic
1. Nursery Versery mini quilt, 2. Love circle blocks, 3. Patchwork wall art, 4. Goodmorning pillow, 5. Mini finished!, 6. Snowdrop table runner, 7. twinkle, twinkle quilt, 8. Central Park makeup roll, 9. Poppy journal cover, 10. 'Reap What You Sew' gardening apron, 11. Basted & Quilted, 12. January:: Do Good Stitches :: Seeing Stars, 13. Dqs11 finished, 14. Habitat bow tie quilt finished!, 15. Christmas Star Quilt, 16. Habitat Back

I've also been busy writing up a new post for tomorrow morning.  For now though here's a sneak peak:

See you in the morning!

Saturday, September 8, 2012

Stash Bee + Mario Update!

Before all the stuff happened with my doggie (who's recovering very nicely BTW) I managed to get some sewing done for the Super Mario Brothers QAL.  I was three blocks behind so I got my booty in gear and got to making them.

Without further ado:
Super Mario Brothers QAL: Question Mark Block
Question Mark Box Block
Super Mario Brothers QAL: Goomba
Goomba Block
Super Mario Brothers QAL: Cloud
Cloud Block
Super Mario Brothers QAL Blocks
Finished Blocks!
One of the other participants of the QAL had a pictiure of a piranha plant block she had made and I just loved it.  Angela (the QAL organizer) has a pipe block planned and I decided to be a little creative and make myself a piranha plant block in place of the scheduled pipe block.  I was doing this block quickly and late at night so there are quite a few little mistakes. So many that I'm going to have to re-do a few seams, but looking past the mistakes I love the way it turned out.

Super Mario Brothers QAL: Piranha Plant
Piranha Plant Block
I also have my August blocks from Stash Bee to show off.  This month our Queen Bee Rachel wanted 4- 6 1/2"  blocks that she could play around with and arrange in way she thought best.  Our only restriction was that she wanted the diagonal piece in each block to be the same fabric.

August Stash Bee Blocks: Layout 1
Layout Option #1
These are two of the possible layouts she could choose for her blocks.

August Stash Bee Blocks: Layout 2
Layout Option #2
I had a difficult go deciding which fabrics to use, but once Rachel told me to use fabrics that showed off who I was I decided to use purple solids and a text print.  I love the way these particular solids compliment each other, and purple is my all time FAVORITE color.

The fabrics I used are Kona Raisin, Thistle, Plum, & Lupine, as well as a text print from Timeless Treasures.

AND if you want to see a picture of what a dachshund with a zipper down his back (or really 59 staples) here you go:


Franken-weenie!

Monday, September 3, 2012

Fred Update

Hi Everyone.

I know things have been super quiet around here but I wanted to pop in and say I'm still here and I'll be back soon to chare some awesome finishes with everyone.

The reason why everything has been so quiet is because of this guy:


My poor doggie Fred blew a disc in his back last week and we've been running around like crazy getting him in to emergency back surgery so he doesn't end up paralyzed for the rest of his life.  He's out of surgery now and in recovery and things are looking good, but it will probably be a few more days at least until he's home and things stabilize enough for me to get back to blogging.

In the mean time if everyone could send kind thoughts our way for our little guy's recovery we would appreciate it.  Thanks.

-Stephanie & family
Related Posts Plugin for WordPress, Blogger...