Monday, May 19, 2014

Bloggers Quilt Festival Spring 2014

It's That Time Again!  Blogger's Quilt Festival is here!!!

AmysCreativeSide.com

The linky party opened a few days ago and it has prompted me to finally get online and blog about the quilt I made my niece Arielle for her birth.


Quilt Stats:
Pattern: Giggle + Squeak pattern from SUCH Designs
Fabrics: Various fabrics in mainly purples, greens, and greys with a few pops of blues and pinks
Methods Used: Applique, quilt-as-you-go, straight line quilting & free-motion quilting
Quilted: By me on my home machine
Dimensions: 46" x 46"
Completed: March 2014

Arielle's nursery theme was Monsters so I knew right away which pattern I would use.  I bought the Giggle + Squeak pattern from Carrie of SUCH Designs a few years ago at a quilt show and she was such a lovely person to meet.  It's always nice to know that people are just as wonderful in person as they seem on their blogs.

 I loved adding all the little details to the faces in each block.  Some definitely came out looking more monster-like than others, but I love them all.


And while this photo isn't the greatest for showing the true colors of the quilt, I love that the quilting is easy to see.  I quilted each block differently as inspiration hit me.  My favorite is the top center since I free-motion quilted loops and hearts in it.  I also loved the top left, which is just a back and forth squiggle, but it took only a few minutes to finish so it was awesome.


 I didn't want to buy any additional fabric for the back so I used up all the leftovers from making the front.  I've never made such a scrappy backing before and I love it.  Since I did quilt-as-you-go on the front there's very minimal quilting on the back. 

I also did a little embroidery tag for the back and appliqued it on in the center of the large square of text you see on the bottom right of the above photo.  And do you see the date?  Today is actually Ari's 6 month birthday! Happy 6 months little one!!!


These photos of Ari enjoying her quilt were actually taken over the weekend, so this is her just a few days shy of 6 months.  She's shaping up to be quite the bruiser, just like her cousin Penny.


Oh, and here's one of Penny with her cousin's quilt before I sent it off.  What do you guys think? Do the girls look alike???


Thursday, May 1, 2014

What Can I Say? I'm Selfish

....Selfish Sewing that is!
I have fully embraced this round of Selfish Sewing Week and I've been spending as much spare time as I can in my sewing room working on projects just for ME. 

So far I've managed to get one project done each day of Selfish Sewing week, and I have plans for the rest of the week.  Let's hope I can keep this ball rolling!

Monday: Open Wide Pouch (Tutorial by Noodlehead)


Tuesday: Ruby Top (Pattern by Made-By-Rae)


Wednesday: Maritime Shorts (Pattern by Grainline Studio)


Thursday: Maritime Shorts #2 (Pattern by Grainline Studio)


I realized that I don't have a picture of the completed Ruby Top I made on Tuesday, so you will all have to make do with my work-in-progress picture I snapped.  I'm currently wearing the top otherwise I'd try and get a shot of it now.

me-made-may'14

Which brings me to Me Made May! (Like I don't have enough things going on).

Here goes!

"I, Steph Granite, sign up as a participant of Me-Made-May '14.  I endeavor to  wear at least one handmade item each day for the duration of May 2014 and to make a new garment each week"

I feel like it might be hard to wear something EACH DAY, but when I think about it I have quite a number of handmade clothes, so I should be able to so it!

Tuesday, April 15, 2014

Reconnecting With My Roots: Garment Sewing

Over the years that I've been blogging I've posted mainly about quilting and sewing small projects, but I rarely ever post about garment sewing, which is funny, because that's what I started out doing!

Yes, like many of you my first projects on a sewing machine were all clothing.  I actually sewed garments pretty exclusively until I discovered quilting 5 years ago, and it's all been downhill from there.

Well recently I looked in my closet and I decided it was time to sew up a few things for myself.

First up was the Ruby Top by Made-By-Rae.  I already had her Washi Dress pattern (see the post here) and I love it so I figured it was time to give Ruby a try.

Ruby Top #1
I started off making a dress but since I'm pretty top heavy it just didn't look right.  I need things that accentuate my curves a little bit more.  But I love it as a top.  I love it so much that I made two more and I have two more in the plans.

Ruby Top #2
Ruby Top #3 (This time in KNIT!)
And since I was on a roll (and since I had just purchased Parcel #1 from Perfect Pattern Parcel) I decided to try my hand at an Ava top.

Sleeve or No Sleeve?
 I had a hard time deciding whether to put the sleeve on it or not, so I solicited the advise of my Instagram friends and everyone said to go with no sleeve, so that's what I did!

Me!
I actually love it sleeveless.  Perfect for sunny California days (which is everyday, people.  Sorry to rub it in your faces)

And because I was feeling confident, I pulled out a WIP from last year's Selfish Sewing Week and I grit my teeth and finished it.


That's right, the Miz Mozelle dress I blogged about in September is finally finished.  I had to carefully pull the collar off and make a new one that laid correctly.  And let me tell you, taking the collar off was no easy feat.  I accidentally ripped a giant hole in the dress, but I was able to cut the neckline just a little bit lower and make the collar just a little bit wider and it all worked out.

It might actually be better, because I can ::just:: manage to maneuver the neckline so I'm able to nurse while wearing this dress.  I wore this one to church this past Sunday and it was so comfortable.  Win!

And guess what?! Selfish Sewing Week is just around the corner and I have some pretty big plans.  So mark your calendars and plan to set aside time to sew something for yourself April 28-May 3
Oh, and while you're doing all that selfish sewing, sew yourself a top as well and join Rae in her Spring Top Sewalong April 14- May 11


Tuesday, April 8, 2014

2014 FAL Q2 List

Helllloooooo!

My computer has been fixed! ::happy dance::

The hard drive on my computer crashed early December 2013 and it's taken this long for us to get it back up and working again, but now I can blog again!  Yay!!!!

I've been busy making tons of stuff, but I'll get to that later.... This post is about UNfinished stuff.

Finish Along 2014

That's right! This is my FAL list for Q2:

1. Hem Husband's suit pants (this is an easy one!) (by Thursday)
Current status: Hem marked, just need to sew


2. Make my Easter Dress!
Current status: Muslin made, fabric purchased, just need to make it


3. Finish the muslin for my Easter dress (you know, so I can wear the muslin)
Current status: All sewn together, I just need to add finishing details line bias tape and hem


4. Make baby boy quilt (by end of April)
Current status: Fabric selected, pattern settled on, just need to do it!


5. Make Henry's birthday quilt (by end of April)
Current status: Fabric and pattern selected.  Just need to sandwich and quilt


6. Make 6 diaper covers
Current status: PUL and other supplies laying around


7. Make 4 baptism gifts.
Current status: Pattern decided on for all, fabric decided on for 1.


8. Finish my January Stash Bee quilt.
Current status: Quilt top completed, need to quilt


9. Finish quilting husband's Mario Quilt
Current status: Partially quilted.  Still needs binding


10. Sew 2 new tanks
Current status: Fabrics and patterns selected (the Ruby tank pattern)


And that's it! I'm limiting myself to 10 projects to finish, and even that's pretty ambitious for me.


Whoops! I guess that's not it!

Project 1B. Add velcro to Deacons' vestments (almost forgot this one!) (by Saturday)
Current status:  Placement marked, just need to sew on velcro by hand


Extra-Ambitious Project 11. Finish Penny's Christmas stocking
Current status: Partially embroidered and sequined


And that's REALLY it!

Sunday, December 29, 2013

Scrappy String Blocks + Bonus tutorial!

Hi everyone! January is my month as queen bee in hive 10 for the 2014 round of Stash Bee, and since I just spent what felt like forever writing a tutorial on how to make these blocks I thought I'd go ahead and share the tutorial with all of you.  Enjoy!

January Block- Hive 10: Scrappy String Block


Materials needed:
-Fabric scraps in bright fresh colors (ranging in length 12 inches to 2 inches, and in width 1 inch to 2 inches)
-White fabric measuring 4 inches by 12 inches
-Glue stick
-Scratch paper
-Pen
-Ruler

We'll start our blocks by making our templates.  We're going to be sewing our fabric strips directly onto the paper and then tearing the paper away, so it's good to use a thinner paper.  I know some people like to use pages from a phone book since they're nice and thin.  I didn't have any phone books laying around, so I just used scratch paper.


Using your ruler draw an 8 inch square.  Draw a diagonal line through the square, and then draw a dotted line 1/2 inch above and below the diagonal.


Next cut your white fabric into 4 strips 1 inch by 12 inches long.  I used Kona white, but you can use any white or off white. 

Now for the fun part! Time to pull your fabric for the strips.  I went a little overboard and this is the pile I pulled.


I then ironed the scraps and cut the fabrics into strips ranging from 1 inch wide to 2 inches wide.  I think the majority of my strips were around 1.5 inches to 1 inch wide.  I didn't worry too much about the length of the strips, I just made sure some of them were at least 12 inches long.


Now grab some strips and arrange them over the template.  You want to make sure the fabric overlaps each other and the edges a bit.  One you have the strips picked out you can stack them in order and set them to the side.


 Now take your gluestick, your template, and one of your white strips... it's time to get started. 


On the template, zig-zag your glue stick along the diagonal, filling in the spaces between the lines.  Then lay your strip on top of the glue.  (you could, of course, omit the glue and either pin your strip in place or carefully hold it in place, but the gluestick works wonderfully)


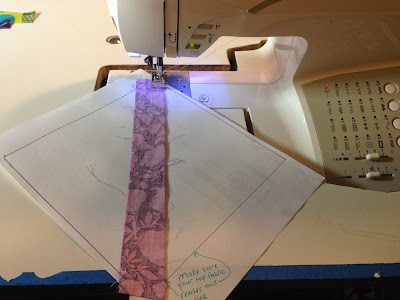
Next, grab your first strip and lay it on top of the white strip, right sides together.   You'll want to make sure that the fabric strip you're about the sew is long enough that it goes over the edges of the template where the seam will be (1/4 inch from the edge).  Check your needle placement to make sure you have a 1/4 inch seam allowance, and shorten your stitch length (I set mine to 4, where my normal stitch length is 5), and you're ready to sew.  Sew down the edge of the strip, going back and forth at the beginning and end of the strip to lock the stitches.


 Now either finger press the seam open or press using an iron. 


Grab your next strip and lay it down right sides together with edges aligned.  Sew along the edge with a 1/4 inch seam allowance.  Open and press. 


 Repeat until you've covered one side of the template.


Now grab your other stack of strips and start on the other side of the template.


Now that your template is covered it's time to trim it down to size (8 inches by 8 inches). I found it easy enough to flip the paper over and trim along the lines drawn on the front of the template.


I found the easiest way to tear the paper away from the block was to fold along each seam, and then give the block a tug to pull the paper from the seams.


The seams will all be pressed towards the outsides of the blocks as a result of pressing the block as you go.  Don't feel you need to press the seams open, having them pressed to the sides is fine.


 Now give it a good press with your iron and it's ready to go!


Now that you've made one, it's time to make 3 more!  Once you get the rhythm of how to make them down they go very quickly.  Here are six of them that I made:


****Bonus Tutorial****
How to add a selvage edge to your quilt block:
On the sixth block I made I added a selvage edge.  I thought it was fun and added an interesting aspect to the block, so I thought I'd share how I did it.
Cut the selvage strip just like any other strip, but do not cut along the finished edge of the fabric, since it's already finished :-) (I probably didn't need to say this, but I thought I'd include it just in case there was any confusion)
Start your block just like any other block.  


When it's time to add in the selvage strip, instead of laying the selvage strip right side down on top of the template and matching the seam with the strip below it, you're going to lay the selvage strip right side UP and overlap the finished edge with the strip below it. 


Now sew down the strip as close to the edge as you can get.  In the picture below my needle is approximately 1/8th inch (or possible even less) from the edge of the finished selvage edge.
  

Once you've sewn down the selvage edge, just continue your block following the tutorial above!
Related Posts Plugin for WordPress, Blogger...