Tuesday, July 31, 2012

July Bee Blocks+ Polaroids!

July has been a busy month!

This month in addition to making all these:

July
I also made blocks for the two bees I'm in.

I've been in Stash Bee since February and this month Jennie asked for a string block with selvages following this tutorial she made.  I pulled some 30's reproduction prints I have and came up with these beauties:

July Stash Bee Block

2nd July Stash Bee Block

July Stash Bee Blocks

This is my first month in the Believe circle at do. Good Stitches and I had some fun coming up with combinations for the box in a box in a box design that Megan asked for.  These are what I came up with:

July Believe at Do. Good Stitches Block

And these last guys aren't for a bee but they are for a swap!  For the *picture-perfect* Polaroid swap on Flickr I made 65 polaroid blocks to swap.  I also made one of each fabric for myself and one for my bestie Beckah, so all in all I made 130!  

*Picture-Perfect* Polariod Swap Blocks 2

*Picture-Perfect* Polariod Swap Blocks 1

I already sent my blocks in and can't wait to see what I get back.

Monday, July 30, 2012

A Birthday Quilt for Harriet

For my Mother in Law's birthday this year we celebrated by joining her on a camping trip and having a small family birthday party at the campgrounds.  She has a membership to a campground up in the desert above Banning, California that she stores her camper at so that's where we went.

It was very hot up in the desert in July (who would have ever thought so?) so we spend a lot of time in the camper playing cards and relaxing.  Well, we would have been playing cards no matter what the weather was like- that's what our family does- we play cards for money.  Not much money, none of us are rich or are big into gambling, normally at the end of the day if you've been having a good day your up 20 cents.  That kind of gambling.

Anyways I've been wanting to make her a quilt for her birthday, so that's what I did.

Quilt for Harriet
Quilt Front
The pattern is a free one from Elizabeth Hartman called New Waves and I made it in the lap size.  I made a smaller version earlier this month using boy fabrics, you can see that post here, and the pattern can be found here.  
Quilt for Harriet
Detail of quilt front

 All the fabrics were ones I picked out on a shopping trip at M&L.  I started with the red batik four rows down in the quilt and then built all the other fabrics around it.  I almost didn't want to give it to her I loved it so much.
Quilt Backing
Quilt back
I quilted it pretty simply since it was a large quilt and I didn't want it to take forever.  I started by quilting lines 1/4 inch above and below each seam.  I loved the way it looked so I left it at that.  It's bound in Kona coal.
Detail of Backing
Patchwork on back
For the backing I used a purple print that I loved but thought didn't work well on the front.  I did a little patchwork for the back and included one of each of the prints on a strip to break up the huge expanse of purple.
 
Detail of Backing
Birthday message
And of course I included a message for her on the quilt back so she always remembers who she got it from and for what occasion.

I still have a lot of the fabrics left so I'm thinking I might make myself something fun.  I could probably make a mini quilt to go in my sewing room, or possibly something for the house like a tablerunner with matching napkins.  Oh the possibilities!

Sunday, July 29, 2012

Padded Camera Pouch + Sale at Michelle Patterns!

Happy Sunday!

I wanted to pop in today to let you all know that there's a sale going on at Michelle Patterns for 20% off your purchase of $10 or more!  And hurry!  The sale ends today.  Just use the code: twozip
Michelle Patterns has some amazing patterns.  Each of them are easy to follow and result in a great product, and she just released two new patterns: the Two Zip Hipster and the Convertible Clutch.

In anticipation of going to the International Quilt Festival in Long Beach I recently made myself a Padded Camera Pouch and I love it.  A few weeks ago on a trip to M&L fabric store in Anaheim I bought myself two yards of Just Dandy by Josephine Kimberling for Robert Kaufman in the pink colorway with the idea to make travel accessories for myself to use when I go to Sewing Summit and decided that this was a good time to cut into it.

The pattern comes in 4 sizes: small, medium, large, and extra large.  Since I wanted my camera case to be big enough to also hold my phone and a few credit cards I went with the medium sized pattern.  The pattern took probably two hours or so to complete, which is not bad for me considering I had never made the pattern before.

Padded Camera Pouch
Padded Camera Pouch with Strap
I made a few adjustments to the pattern, including adding a strap.  I did to by adding a D-ring onto the body of the camera pouch itself and then making myself a removable wristlet key fob strap using a swivel clasp that clips onto it when I want the bag to have a handle.

Open Padded Camera Pouch
Open Camera Pouch
The pattern also calls for an eyelet hole for the drawstring but since I didn't have one on hand I just made a buttonhole hole and it works great.
 
Closed Padded Camera Pouch
Closed Camera Pouch
The whole thing cinches up so I never have to worry about stuff falling out if the flap were ever to open while carrying it on my wrist.  
 
Closed Little Wallet
Closed Wallet
Since I wanted to carry a small wallet in my pouch to the quilt show I whipped up this little one to match.  I used the Basic Wallet Pattern that I've used before here but instead of making it full sized I made it two inches shorter.  The wallet I ended up with is just the perfect size to hold a few credit cards in the front pocket and some money in the large pocket.
 
Little Wallet
Open Wallet
  I love the way they both came out, and am really looking forward to making myself a few more matching accessories before Sewing Summit.  I'm thinking a makeup bag, a camera strap, and maybe a duffel or tote?  Not sure yet, but I LOVE this fabric!

Padded Camera Pouch and Little Wallet
Camera Pouch and Wallet
Happy Sewing everyone!  I hope you take advantage of the last day of the sale (7/29) and stock up on some awesome patterns from Michelle Patterns.

(Fair warning: this is a sponsored post, but the opinions are 100% true and my own)

Thursday, July 19, 2012

Super Mario Bros QAL progress

Cut To Pieces

I finally got started cutting my squares for the Super Mario Bros QAL on Tuesday and yesterday I managed to whip up the first two blocks: Mario and Luigi.

Each square starts at 1 1/2" square so when it's all sewn together the block is made up of 324 1" squares-- crazy!  I decided that to make the future blocks easier on myself I'd cut all the fabric at once and put it into zip-lock baggies.  It didn't take me that long to get all the cutting done.  I did it while watching the first two Harry Potter movies.

cut squares
Cut squares ready to go!

The method we used for piecing all the squares together fantastic. The process was new to me but I've seen it before on Oh! Fransson and Angela does a great job explaining it in the post about block construction for the QAL. 

Instead of the stabilizer she recommends (which is hard to find and pricy) I used Pellon 541 Wash and Gone along with basting spray to get the squares to stick.  After reading that another QAL member had problems drawing her grid on the stabilizer I was super careful and opted to use a washable felt tip marker rather than a pencil and had no issues with it.

Mario in-progress
Mario squares on the stabilizer

My only tips for using the basting spray it to shake your can well to get an even spray and to spray only a line or two at a time. If I tried to spray and then lay down three lines of squares I found that the stabilizer was only tacky instead of sticky, so I'd have to re-spray to get the square to stick.

When it came time to sew I also discovered that it's best not to wait. I laid down all the squares for Mario and sewed immediately and had no problems. I laid out the squares for Luigi and then waited a few minutes to sew and by the time I was finishing up I was noticing that some of the squares were starting to lift off the stabilizer.

Mario
Mario drying after having the stabilizer washed off

Luigi
Luigi drying after having the stabilizer washed off
Making these blocks was a lot of fun and very rewarding since they look pretty awesome.  They're also HUGE--they measure 18.5" square finished.  I can't wait until Angela gets more block layouts posted so I can get started on them.  This quilt is a gift for my husband and he's absolutely loving it so far.

You can check out everyone else's progress in the Flickr group.

Tuesday, July 17, 2012

Sewing for Babies

This past week I've been super swamped making baby quilts and I love it!

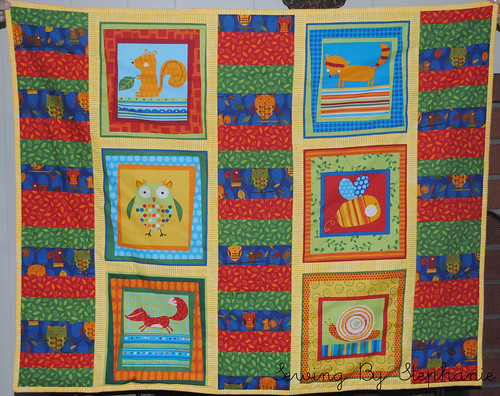
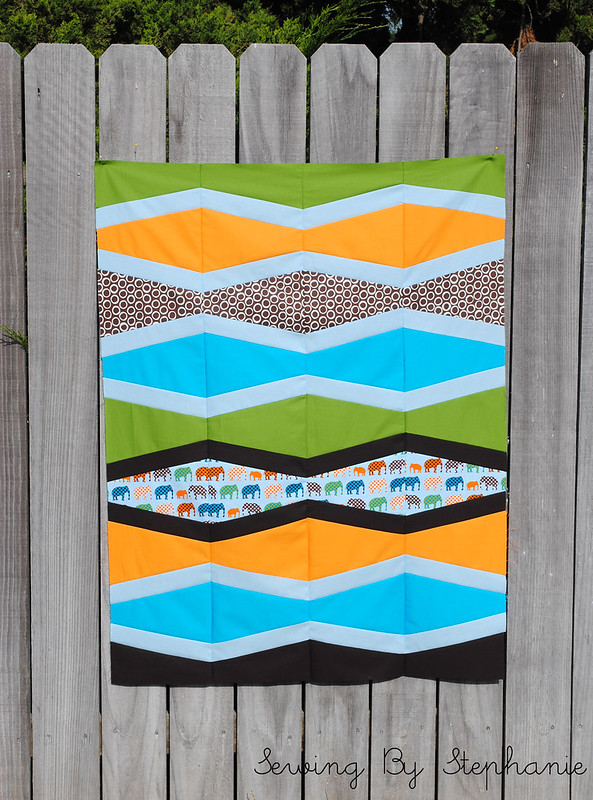
When I got home from camping I immediately began working on a baby quilt for my friend Claire's new baby boy. I went fabric shopping last Wednesday with Rebeckah at M & L fabric discount store in Anaheim and we came back with several steals (especially since everything in the store was 20% off!) including the fabric to make this beauty:


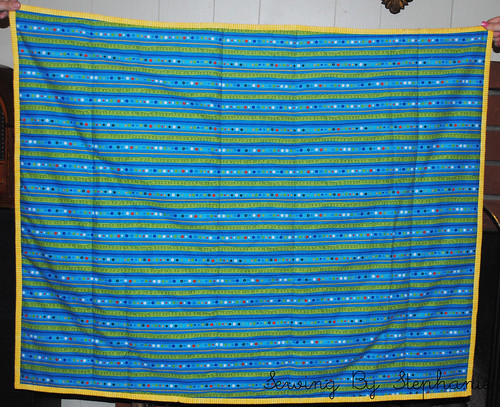
The large blocks are cut from a panel of 8 images from Robert Kaufman's Animal Party Too! collection.  We used a yellow stripe from my stash for sashing around the large blocks and for binding, and then we used 3 coordinating prints from the Animal Party Too! collection for the stacked coins panels.  The backing is yet another coordinating print with fun blue stripes.

 Back of Claire's Quilt

Rebeckah and I teamed up on this quilt like we normally do when it's for a mutual friend.  She did the sashing while I did the stacked coins, and then I sewed the top together.  Together we sandwiched and basted it, and then she quilted it.  I made and attached the binding and then both of us sewed it down by hand old-fashioned quilting bee style.

We worked together a little more on this quilt than we usually do because we only had 2 days to get it done!  Even working together we were still sewing the binding down when Claire arrived for the baby shower.  Luckily though we were able to hide out for the few minutes it took us to finish the quilt and nobody was the wiser.

Besides the stress of getting a quilt done last minute the downside to rushing is that there's no time to get a decent photo.  The above photos were snapped in my living room during the shower around 10 at night so you'll have to forgive the horrible lighting (and the fact that the quilt isn't pictured on my fence like my quilts normally are).

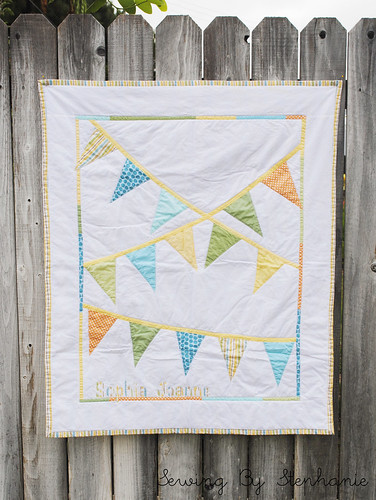
To add to the chaos of it all in the middle of working on Claire's quilt I got a custom order from Katie on Etsy for a bunting quilt on Thursday afternoon.  I was in such a rush when I started making it that I made 70% of the quilt top before I realized that I was WAY off in my dimensions and had to start over.  I waited until yesterday to start over so I had a chance to clear my mind and enjoy my weekend before jumping back in.  After a whirlwind sewing session I'm happy to say that I finished the custom order and it looks fantastic.

Custom Bunting Quilt

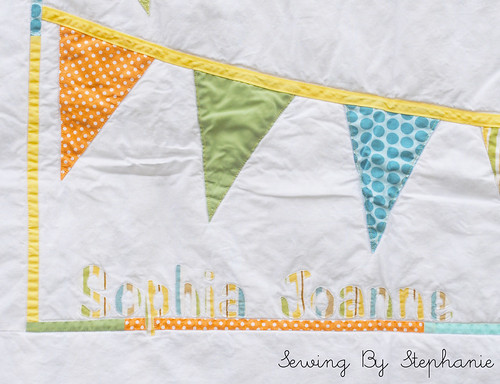
I hope Katie likes it.  It's for her niece Sophia Joanne and she had me tweak the colors of the quilt slightly to include orange and take out the darker blue and grey that were in the original quilt.

Detail of Personalization


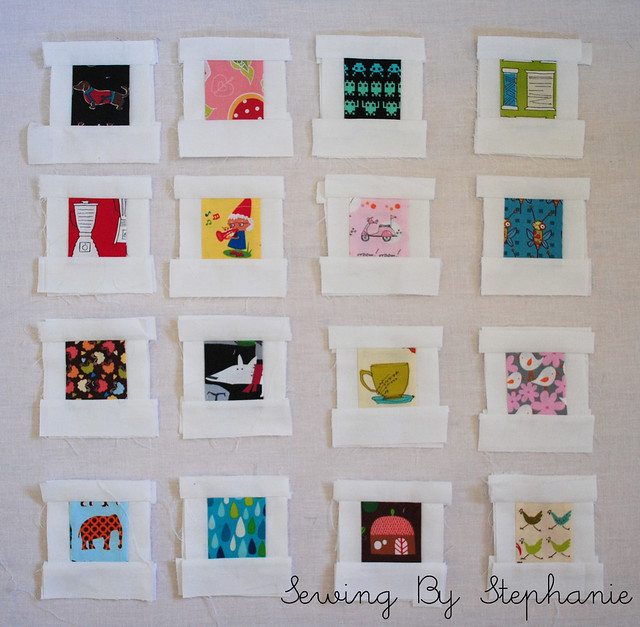
She also added customization to her quilt.  It doesn't stand out as well in the pictures as it does in person, but it was a lot of fun quilting the letters down (as well as a lot of work).  I shipped it off this morning and now I can settle down and enjoy some selfish sewing.  I'm currently fussy cutting centers to make polaroid blocks for the *picture-perfect* polaroid block swap going on over at Flickr, as well as cutting squares for the 
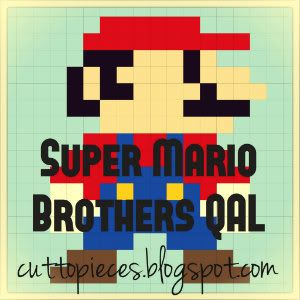
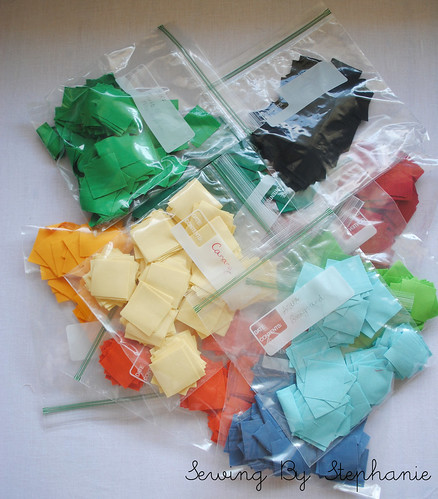
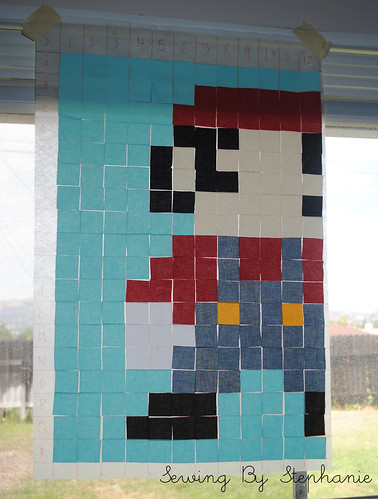
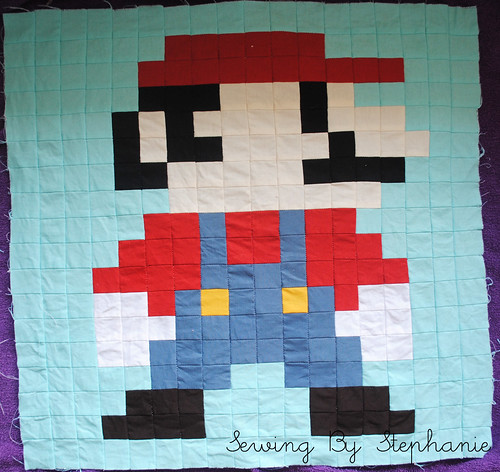
Super Mario Bros QAL.

Sunday, July 8, 2012

Bloomerie Scrap Challenge Entry


Greeting from Silent Valley Campgrounds, Banning CA!

My husband and I took a few days off to go camping with his mom to celebrate her 63rd birthday, so that's where I've been for the past few days.  I had to jump online today though to share my completed entry for the Bloomerie Scrap Challenge hosted by Rachel of Stitched in Color and sponsored by Bloomerie Fabrics.

I received the stack of 7 fat sixteenths of fabric from Bloomerie a little over a week ago but couldn't decide what to do with them until the day before we were supposed to leave to go camping.  When I first heard that I had been selected as one of the 4 contestants I thought I'd make a wallet but decided against it.  Then I thought I'd make a cool quilt block and use it to make a pillow or a notebook cover, but I didn't really like that idea so I scrapped it. 

Then I got the idea to make a wall hanging to go in my sewing room.  I've never made anything to go in my sewing room and the thought of making something that was 100% just for me was appealing, so that's what I went with.  For some reason as soon as I decided to make a wall hanging the words "SEW. QUILT. LOVE." came to mind so I decided that a paper pieced wall hanging with those words would be the perfect way to use my scraps.  I used the refrigerator magnet pattern from Elizabeth at Oh! Fransson for the pieced lettering and made my own pattern for the spools of thread.


We were allowed to add one additional fabric so I chose Kona Ash.  It's very versatile and I thought it looked great with the cool summery colors of the bundle Bloomerie sent me.  I was lucky and had a large piece of Kona Asparagus left over from a different project and that just happened to be the same solid green that was included in the bundle and so I used it for the backing.


In addition to adding one more fabric to the bundle we were allowed to use as many trims or embellishments we wanted, so I used some silvery-white perle cotton embroidery thread and hand quilted around the word "QUILT." to make it stand out from the other words.  I had originally thought to hand quilt around all the letters but once I saw how busy it made the wall hanging look I decided to stop at quilting around "QUILT." (plus it just makes sense to quilt "QUILT.").


I managed to get all the paper piecing done before I left for my camping trip but the binding and quilting I did while camping.  I discovered that it's not as easy as I thought to keep a project clean while roughing it outdoors.  Luckily for me my MIL is also a sewist and has an iron and ironing board with her on this trip so I was able to wash the finished wall hanging in a tub, line dry it in the sun, an then iron it so it looked pristine again before taking photos.

I'll definitely take more photos of the wall hanging once it's in its rightful place hanging on the wall in my sewing room.  For now though I hope you like the few photos I was able to snap of it on my little point and shoot.  I'll be back to civilization in a few days so hopefully you'll hear more from me then!

-Stephanie

Sunday, July 1, 2012

Issachar's quilt

This isn't the quilt top I thought I'd be posting about today but oh well-- it's still a fun quilt top.  This quilt is going to be a baby shower gift for my friend Juliana.

The pattern is a free one from Elizabeth Hartman called New Wave Quilt.  The free pattern can be found here.

New Wave quilt top

I changed it up a bit to make it smaller.  Mine is 9 down and 4 across instead of 12 down and 6 across like the pattern calls for.  The hardest part of this quilt BY FAR was getting the points to line up. I got to the point where I'd use my basting stitch when sewing the vertical seams so I could check to make sure they lined up- then I'd make any adjustments needed- and then I'd go back and sew with my regular length stitch.

Detail of quilt top

The colors I  chose were inspired by the elephant print I used. I really enjoyed working with so many solids on this one.   

I'm teaming up with my friend Rebeckah on this one to get it done in time, so I made the quilt top and she's going to quilt and bind it.  The shower is next weekend and unfortunately I'll be camping so I won't be able to make it but Rebeckah will be there and she'll be able to give it to our friend so she has it when her new little boy Issachar makes his appearance!
Related Posts Plugin for WordPress, Blogger...