Showing posts with label Stash Bee. Show all posts

Sunday, December 29, 2013

Scrappy String Blocks + Bonus tutorial!

Hi everyone! January is my month as queen bee in hive 10 for the 2014 round of Stash Bee, and since I just spent what felt like forever writing a tutorial on how to make these blocks I thought I'd go ahead and share the tutorial with all of you.  Enjoy!

January Block- Hive 10: Scrappy String Block


Materials needed:
-Fabric scraps in bright fresh colors (ranging in length 12 inches to 2 inches, and in width 1 inch to 2 inches)
-White fabric measuring 4 inches by 12 inches
-Glue stick
-Scratch paper
-Pen
-Ruler

We'll start our blocks by making our templates.  We're going to be sewing our fabric strips directly onto the paper and then tearing the paper away, so it's good to use a thinner paper.  I know some people like to use pages from a phone book since they're nice and thin.  I didn't have any phone books laying around, so I just used scratch paper.


Using your ruler draw an 8 inch square.  Draw a diagonal line through the square, and then draw a dotted line 1/2 inch above and below the diagonal.


Next cut your white fabric into 4 strips 1 inch by 12 inches long.  I used Kona white, but you can use any white or off white. 

Now for the fun part! Time to pull your fabric for the strips.  I went a little overboard and this is the pile I pulled.


I then ironed the scraps and cut the fabrics into strips ranging from 1 inch wide to 2 inches wide.  I think the majority of my strips were around 1.5 inches to 1 inch wide.  I didn't worry too much about the length of the strips, I just made sure some of them were at least 12 inches long.


Now grab some strips and arrange them over the template.  You want to make sure the fabric overlaps each other and the edges a bit.  One you have the strips picked out you can stack them in order and set them to the side.


 Now take your gluestick, your template, and one of your white strips... it's time to get started. 


On the template, zig-zag your glue stick along the diagonal, filling in the spaces between the lines.  Then lay your strip on top of the glue.  (you could, of course, omit the glue and either pin your strip in place or carefully hold it in place, but the gluestick works wonderfully)


Next, grab your first strip and lay it on top of the white strip, right sides together.   You'll want to make sure that the fabric strip you're about the sew is long enough that it goes over the edges of the template where the seam will be (1/4 inch from the edge).  Check your needle placement to make sure you have a 1/4 inch seam allowance, and shorten your stitch length (I set mine to 4, where my normal stitch length is 5), and you're ready to sew.  Sew down the edge of the strip, going back and forth at the beginning and end of the strip to lock the stitches.


 Now either finger press the seam open or press using an iron. 


Grab your next strip and lay it down right sides together with edges aligned.  Sew along the edge with a 1/4 inch seam allowance.  Open and press. 


 Repeat until you've covered one side of the template.


Now grab your other stack of strips and start on the other side of the template.
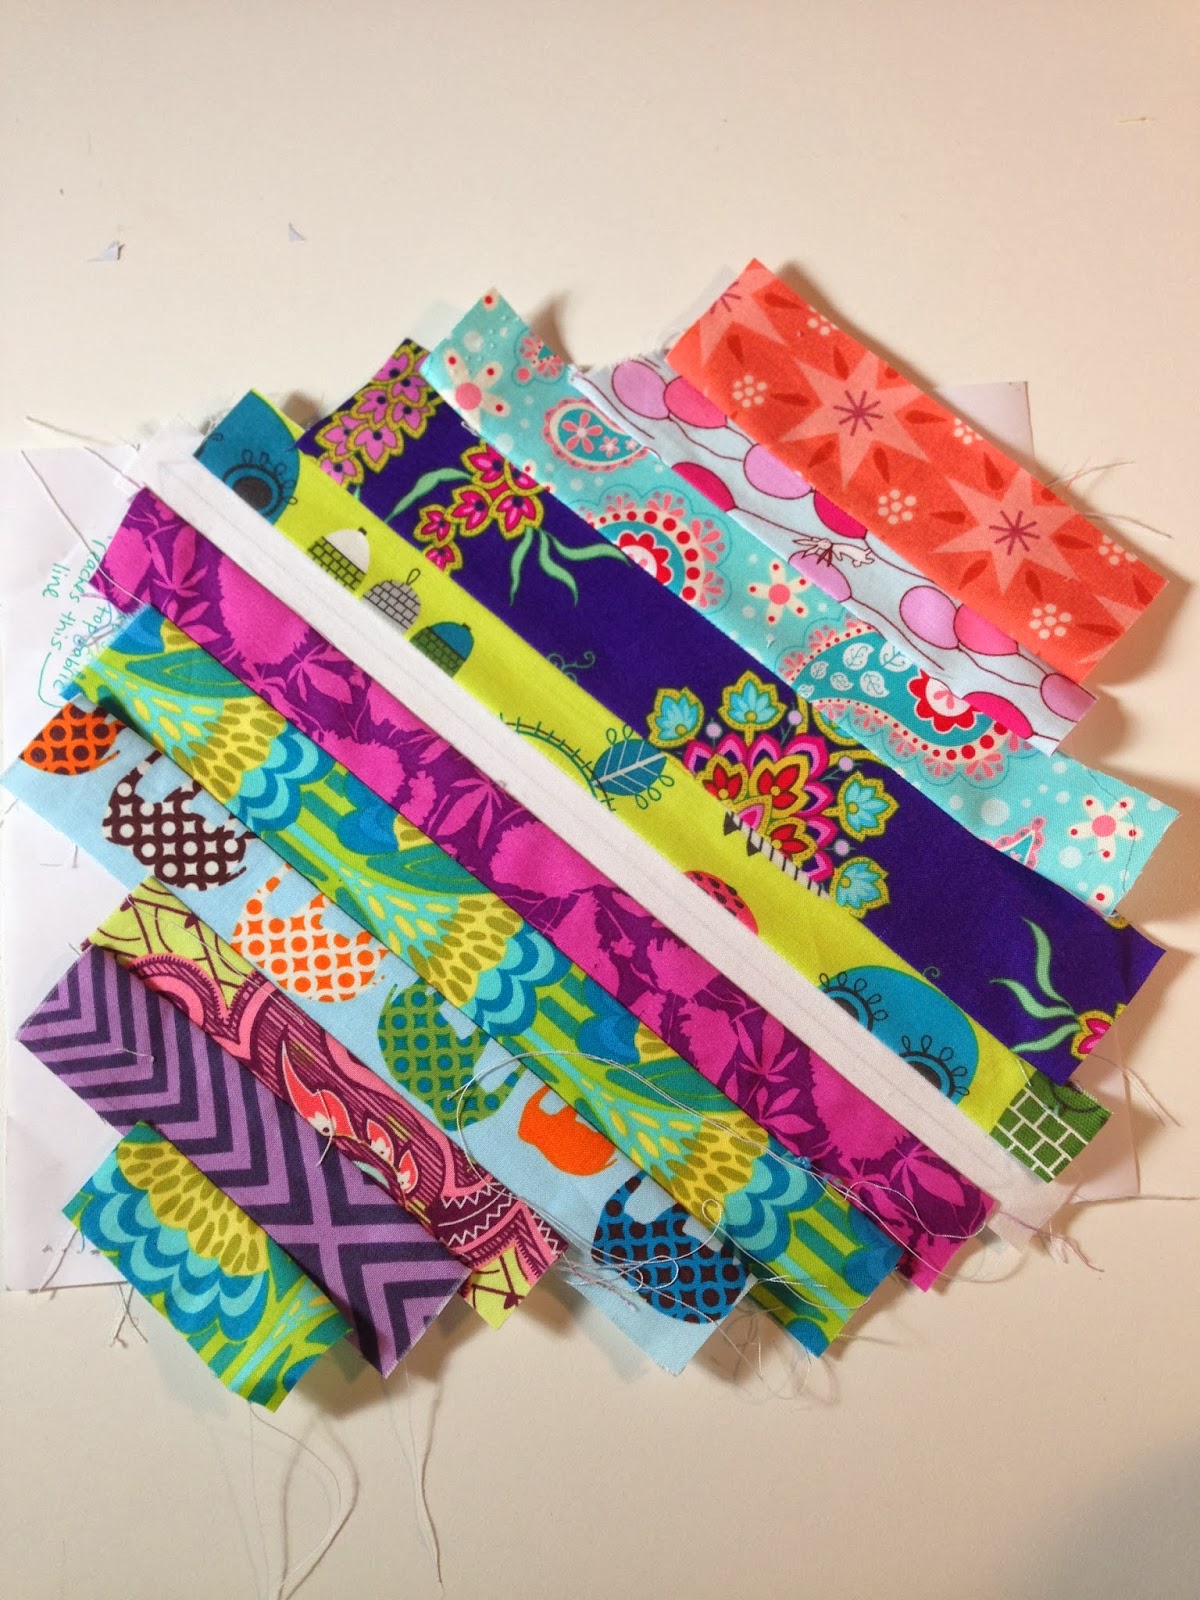

Now that your template is covered it's time to trim it down to size (8 inches by 8 inches). I found it easy enough to flip the paper over and trim along the lines drawn on the front of the template.


I found the easiest way to tear the paper away from the block was to fold along each seam, and then give the block a tug to pull the paper from the seams.


The seams will all be pressed towards the outsides of the blocks as a result of pressing the block as you go.  Don't feel you need to press the seams open, having them pressed to the sides is fine.


 Now give it a good press with your iron and it's ready to go!


Now that you've made one, it's time to make 3 more!  Once you get the rhythm of how to make them down they go very quickly.  Here are six of them that I made:


****Bonus Tutorial****
How to add a selvage edge to your quilt block:
On the sixth block I made I added a selvage edge.  I thought it was fun and added an interesting aspect to the block, so I thought I'd share how I did it.
Cut the selvage strip just like any other strip, but do not cut along the finished edge of the fabric, since it's already finished :-) (I probably didn't need to say this, but I thought I'd include it just in case there was any confusion)
Start your block just like any other block.  


When it's time to add in the selvage strip, instead of laying the selvage strip right side down on top of the template and matching the seam with the strip below it, you're going to lay the selvage strip right side UP and overlap the finished edge with the strip below it. 


Now sew down the strip as close to the edge as you can get.  In the picture below my needle is approximately 1/8th inch (or possible even less) from the edge of the finished selvage edge.
  

Once you've sewn down the selvage edge, just continue your block following the tutorial above!

Friday, January 18, 2013

January Bee Blocks

I've been busy all day trying to catch up on bloggy stuff.  Mostly Stash Bee stuff (have I mentioned that I'm the Hive Mama for Hive #2 in Stash Bee?).  Well, I'm finally all caught up and I thought I'd share the January blocks I finished for the bees I'm in.

For Rebeckah in Stash Bee:

January Stash Bee Blocks

For Megan in the BELIEVE circle of do. Good Stitches:

January do. Good Stitches Block

January do. Good Stitches Block

My blocks for Megan are all packed up and ready to be posted, I just have to find time to go to the post office!

In other news I'm going to a birthday party for my aunt tomorrow and have yet to make a present.  Let's see what I can get done last minute!  Woohoo procrastination!!!!

Thursday, January 17, 2013

WIP Wednesday... er... Thursday

I had INTENDED to write this post yesterday morning but instead got caught up in a frenzy of cleaning house/ doing laundry/ baking bread/ making dinner that lasted until 8pm.  I am very happy to say though that while my Wednesday might have ended up sans-sewing and sans-blogging, I did get a LOT done, and it leaves me all day today to work on sewing projects.

Okay, onto the WIP Wednesday post!

I managed to get two of the WIPs on my list finished, as well as get 4 blocks completed for the December queen of Stash Bee.

Finishes from WIP list:

1. Repair Deacon Rick's Vestments (I currently need to cut new panels and then sew them in)  Done! (Completed 1/8/2013)

No pictures of this one.  I made a mistake cutting the lining of the vestment and then panicked.  By the time I figured out how to fix it and then actually got it fixed it was late at night and I just wanted to be done with it, so I wasn't really in the mood to try and set up a photo shoot.  It ended up being a good thing that I made the mistake I did, because the way I ended up fixing it looked much nicer than it would have looked if the way I was going to do it had worked the first time.

2. Finish sewing Steve's bookshelves (need to surge the edges and then make the fold-over pockets for the rods to go through) Done! (Completed 1/9/2013)


Here the bookshelves are installed in Steve and Jennifer's nursery

The seam where I had to sew two panels together
Stash Bee December blocks for Jackie (completed 1/15/2013):

Stash Bee December Blocks

Stash Bee December Blocks

Stash Bee December Blocks

Stash Bee December Blocks

I'm hoping to get my do. Good Stitches blocks done in the next few days, and maybe also a little free motion quilting using the Supreme Slider I bought back in September and still haven't had a chance to try out (why is it that September through December are always my busiest time of the year?)

Monday, November 5, 2012

October Bee Blocks

I've been pretty absent from the sewing scene recently.  I don't know how October ended up being so busy for me, but I found that I just had no time to sit down and sew almost all month.

As a result, I was a little late getting by bee blocks done, but here they are.

My October Stash Bee blocks:

October Stash Bee Blocks

My October do. Good Stitches blocks:

October do. Good Stitches

October do. Good Stitches

October do. Good Stitches


After uploading my do. Good Stitches blocks to the group I realized that I made a mistake in my construction of the blocks, so now I'm waiting to hear if the bee mama Jenn wants the blocks as is or if I need to pull them apart and re-assemble them correctly.  I guess it's just a lesson for me in the importance of actually looking at the tutorial while making the blocks. 

On a side note these do. Good Stitches blocks will be flying off to Hawaii with some friends.  The October do. Good Stitches mama for my circle is Jenn of Knotted-Thread and she's doing a few charity quilts for Sandy victims and I signed up to make a few blocks for one of her quilts. She's planning on hand delivering the quilts in December when she goes to visit family and friends in New Jersey.  If you're interested in donating a few charity blocks the sign ups are still open.

name for blog

Sunday, September 16, 2012

September Bee Blocks

What?!?! It's not even the end of the month and I've already finished my bee blocks? Crazy!

Here is my September block for Anneliese in Stash Bee.

September Stash Bee block


I used a lot of Good Fortune scraps while making this one.

And here are my BELIEVE at do. Good Stitches blocks for Vicki.

September do. Good Stitches block #1

I love the grey/black/white/red/pink color scheme that she chose.

September do. Good Stitches block #2

I had a lot of fun on this one getting the squiggly lines to match up.

September do. Good Stitches blocks

And since we had one member of our do. Good Stitches group drop pout in September I was two blocks short for the quilt I was planning so I made two additional blocks.

August do. Good Stitches #3-4

I hope everyone enjoys their Sunday, I know I'm planning to!

name for blog
Related Posts Plugin for WordPress, Blogger...